Balzac- Bloodsucker

R-7214746-1436343015-7800.jpeg July 7 marked the release of the new Balzac album, Bloodsucker. And since then, I have spent some time with this album.

Unfortunately, Balzac gets disregarded as a Japanese Misfits. And that is mostly based on their look and marketability as such. They have the Misfits connection, but there music is WAY beyond anything Gleen Danzig or Jerry Only have ever dreamed of in their past or present endeavores. Balzac’s musical ideas,abilities,originality and creativity is light years beyond any other band on Earth. And those who have sat down and listened to more that two songs know exactly what I’m talking about. Balzac may have started out as a horrorpunk band, but they have evolved into a musical style that cannot be piegonholed or stereotyped. The lyrical content usually keeps away from campy horror,though not always, in favor of more dark and sinister content and real life horror. Balzac is band know for releasing many versions and remixes of their songs. Even go as far as rerecording a different song with the music from another song and completely changing the music to the first song. They have even created a unique sound that they have dubbed “digital horror”, that can be found in some songs and is strongly present on a few albums. But they also aren’t afraid to strip it down to just 4 guys showing you there immense talent.

And that brings me to Bloodsucker. I can’t say it more simple than, THIS IS A GREAT ALBUM. While 2013’s Blackout , 2010’s Judgment Day and 2009’s Paradox were more experimental,aggresive, noise driven albums, Bloodsucker has more in common with 2008’s Hatred:Destruction=Construction album. In that I can listen to the album straight through and really enjoy it.

That’s not to say there isn’t aggression or noise on Bloodsucker, but Bloodsucker is a more rounded out album. We start ot with a quick 50 seconds creepout of strange sounds with “12-20-68 7-4-69”. It is follwed up by the hardcore with a slight metal tinged “I Suffer”. The other hard hitters on here like “Bloodsucker” and “Atom Age II” showcase just how rowdy these boys can get. The Ace of Spades tinged “Spit It Out” is definitely a toe tapping, fist pumper. While songs like “199666” and a few Japanese titled songs are structured more like older Balzac songs. Perhaps a Beware of Darkness or Came Out of the Grave era Balzac. As is the Halloween anthem “Trick or Treat”.  And the song “Wonderwall”  ,a single that was released last year that made it’s way to this album, harkens back to Balzac’s Deep Blue:Chaos from Darkism days.

All in all, there is a lot of stuff to grab onto in this album and to keep all Balzac fans satisfied. A great album that never gets boring or feels like it’s dragging. And 14 tracks is the perfect amount of songs for an album. Bloodsucker will definetly go down as one of Balzac’s finest achievements and a classic album.

R-7214746-1436342920-1635.jpeg

Freaky Tiki Surf-ari: The Return

Huzzah!

2015 has proven to be quite the year for the world of exotica. Although several great albums have been (or will be) released, I thought it best to save discussion of those for another time. It seemed to be the only appropriate way to handle the matter, given the recent passing of exotica pioneer Robert Drasnin. The only silver lining to this cloud is that Mr. Drasnin’s status as one of the founding fathers of the genre is finally being widely recognized. I would like to dedicate this year’s Freaky Tiki Surf-ari to him.

As you wait for this year’s crop of reviews, please enjoy last year’s complete series:

Freaky Tiki Surf-ari: 6′+ Episode 116 is Up!
Freaky Tiki Surf-ari: The Return
Freaky Tiki Surf-ari: Hello Little Olives
Freaky Tiki Surf-ari: The Tsultry Tsounds of Go!Tsunami
Freaky Tiki Surf-ari: Creepxotica
Freaky Tiki Surf-ari: Beware the Dangers of a Ghost Scorpion

Every year I share a free exotica download and this time I wanted to do something extra special. And what could be more special than both of the Two Zombies Later compilations from Comfort Stand Recordings? There’s even free printable CD covers for those of us who prefer physical copies of our music.

In memory of Robert Drasnin

Wear And Tear

Over the weekend I finished up the bottled specimens I started last week, applying collection labels and the final weathering treatment.


Here’s the “critter” after it was sealed in it’s bottle with wax. After a week the isopropyl alcohol doesn’t seem to be reacting with the figure’s baked Sculpey or the acrylic paint and liquid acrylic coating it, so I’m pretty sure it will be stable enough for long-term display.


Here’s the same bottle after the label and weathering was applied. Since I have a tendency to under-weather props I went all out on this one, wearing away the paper of the label and applying multiple washes of paint, cocoa powder, and charcoal dust for a very old and worn feel. The end result looks like this thing has been sitting on a damp, dusty shelf for years.


That cloudy film of dust on the bottle is actually a layer of matte fixative that coats and protects all the weathering once it’s done. I’ve scrubbed it off with a brillo pad in spots because I don’t want to cover up all the details of the critter, but I still want that feeling of age and layers of dust.


A medium shot of the finished product. The irregular shape of the wax seal looks like an old, hand applied bit of work. I’m also happy with how the label turned out, with the appearance of paper that’s been slowly mouldering and flaking away over the years.

If you like it, why not try making your own? You’ll find the basic directions over here, a supply of ready-to-print labels here, and any advice I can offer is just an email away.

This article originally appeared at Propnomicon. In order to make sure you visit the site, here’s a link to his article about floating your bottled props.

Creative Commons License
This work is licensed under a Creative Commons Attribution-Noncommercial-Share Alike 3.0 Unported License.

Gravedigger’s Local 16 is not to be held responsible for the content on or anything that may occur (be it good or bad) as a result of visiting any links (or constructing a project that’s detailed on them). Attempt at your own discretion.

Miskatonic University Specimen Labels

The title pretty much says it all. This is an improved sheet of labels for specimens from Miskatonic University’s Special Collections, based on the original version over here and the revised single label here. The sheet contains three 2″ by 3″ labels and one 3″ by 4″ label for larger samples and includes crop marks to make trimming easier. Just cut to size and glue them to a specimen bottle or case to make an attractive prop.

You can download the PDF file from Google Docs over here.

This article originally appeared at Propnomicon.

Creative Commons License
This work is licensed under a Creative Commons Attribution-Noncommercial-Share Alike 3.0 Unported License.

Gravedigger’s Local 16 is not to be held responsible for the content on or anything that may occur (be it good or bad) as a result of visiting any links (or constructing a project that’s detailed on them). Attempt at your own discretion.

Bottled Nightmares

One of my best Father’s Day gifts was the Panasonic Lumix DMC-TZ5 digital camera . After spending close to a decade using the same digital camera I bought in back in 2000, a Canon Powershot A-10, the difference is like night and day. I’m finally able to take some quality shots of my props! Well, at least I can’t blame the camera for crappy pictures anymore. Heh.

These are some quick shots of some bottled specimens created using the same basic techniques I discussed back in March . They haven’t undergone the final weathering process, so there’s still quite a bit of work needed to finish them, but I thought you might find their creation interesting.


First up we have one of my “Cthulhu Critters”. One of the reasons I’ve been holding off on bottling these things up is because of their fragility. I was worried that even with a wire armature a small figure like this would be liable to break during handling as it repeatedly hit the inside of the glass jar. That’s still a concern, but a little experimentation demonstrated that the liquid inside the jar provides enough drag to keep the creature inside from accelerating to dangerous levels.


The same creature from another angle. The preservative fluid is isopropyl alcohol with a drop of green food coloring. There hasn’t been any visible sign of a reaction between the fluid and the vinyl or acrylic in the critter, but I’m keeping on eye on it just in case. You’ll also note that I’ve added just a little color to the paraffin wax. Nothing wrong with plain ol’ wax, of course, but the tint helps give an impression of age.


A carnivorous sea worm collected off the coast of Innsmouth, Massachusetts. The preservative fluid in this bottle is a mixture of distilled water and propylene glycol. It seems to be clearer than isopropyl alcohol, and the color of the fluid is much richer, thanks to it’s higher refractive index.


One of the specimens collected by the Miskatonic expedition to Antarctica in 1931. This “eye” was removed from an amazingly well-preserved aquatic radiate of a heretofore unknown species.


This angle really shows off the structure of the eye. Again, the preservative fluid is a mixture of distilled water and propylene glycol. The brownish-black tint was produced with one drop each of red and green food coloring. Right now the colors produced are a bit hit and miss, but I think I can solve that by diluting the food coloring with alcohol. With a lower concentration of dye in each drop I should be able to slowly mix the color I want without over-saturating the preservative fluid.

This article originally appeared at Propnomicon.

Creative Commons License
This work is licensed under a Creative Commons Attribution-Noncommercial-Share Alike 3.0 Unported License.

Gravedigger’s Local 16 is not to be held responsible for the content on or anything that may occur (be it good or bad) as a result of visiting any links (or constructing a project that’s detailed on them). Attempt at your own discretion.

Preserved Tissue Specimen Tutorial

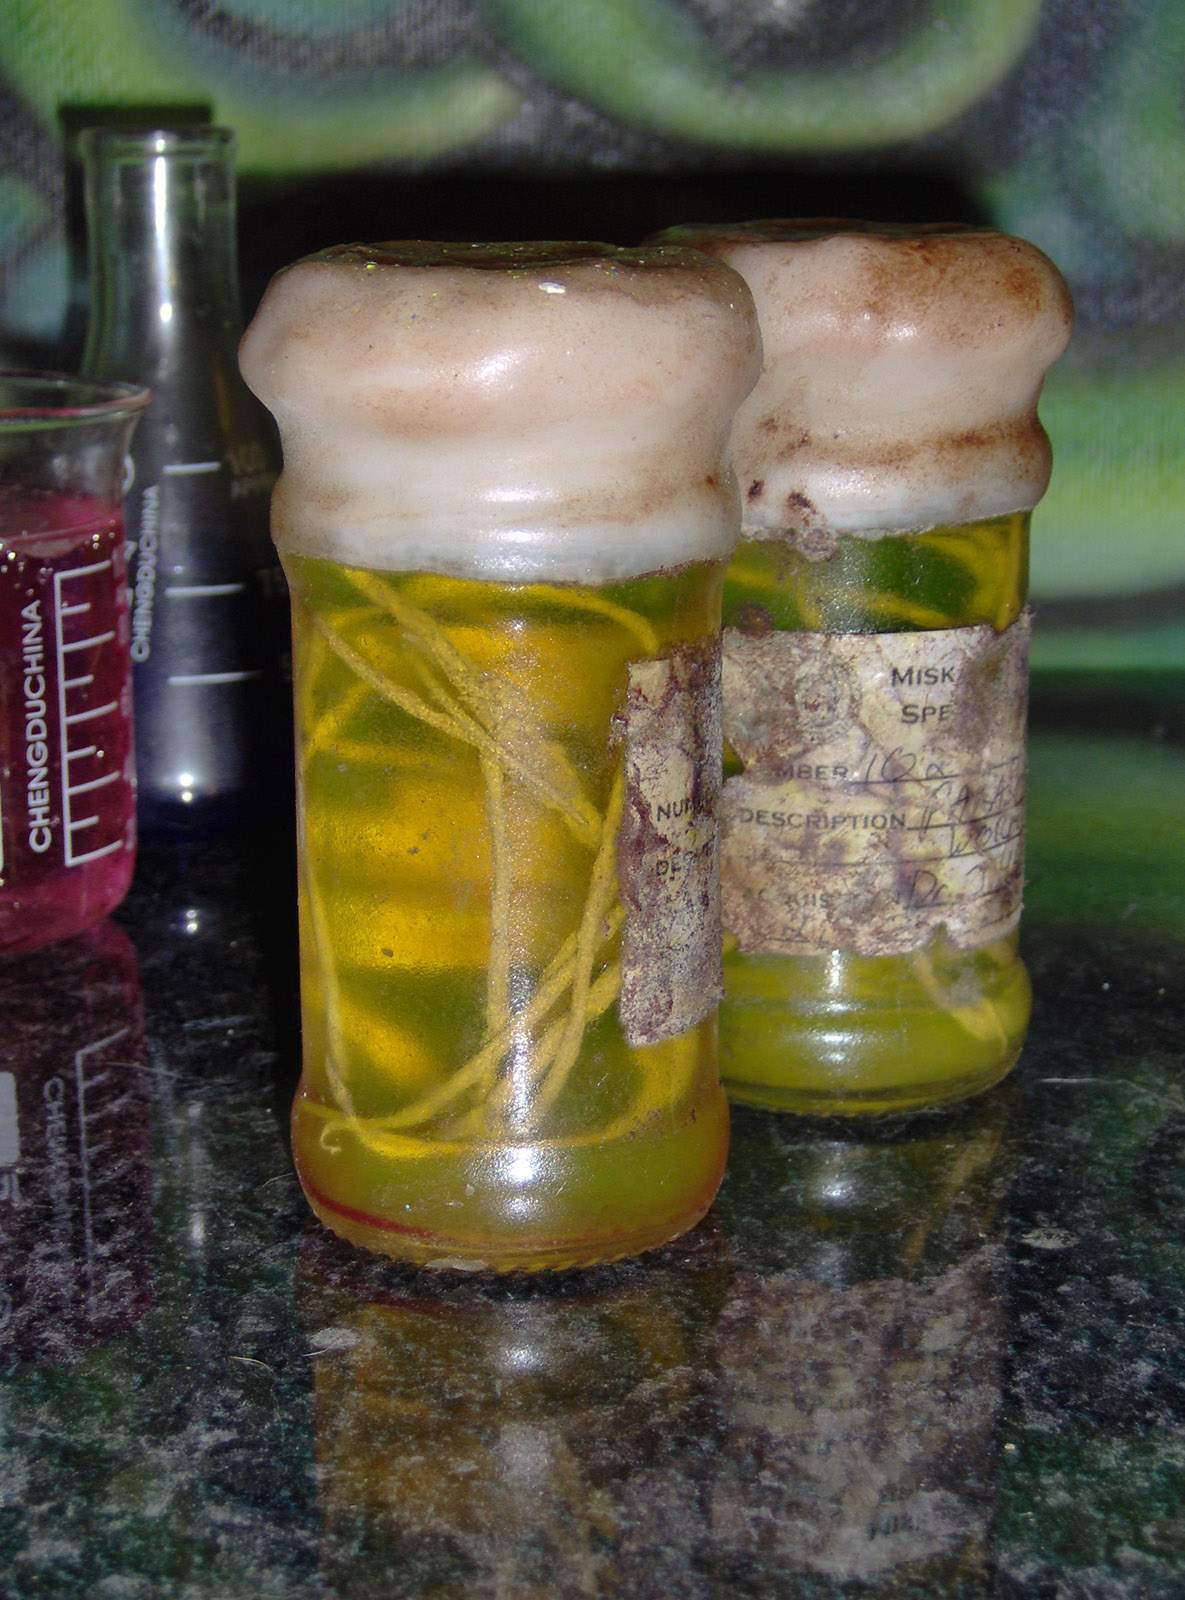
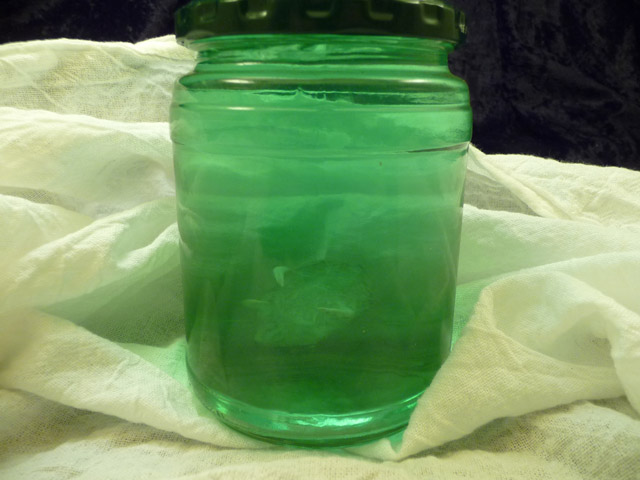
There’s nothing quite like a preserved bit of nastiness in a bottle. A specimen floating in murky liquid in a dirty sample jar just calls out to people.  They want to pick it up, turn it around, and take a good look at what’s inside.  The ickier it is, the better.

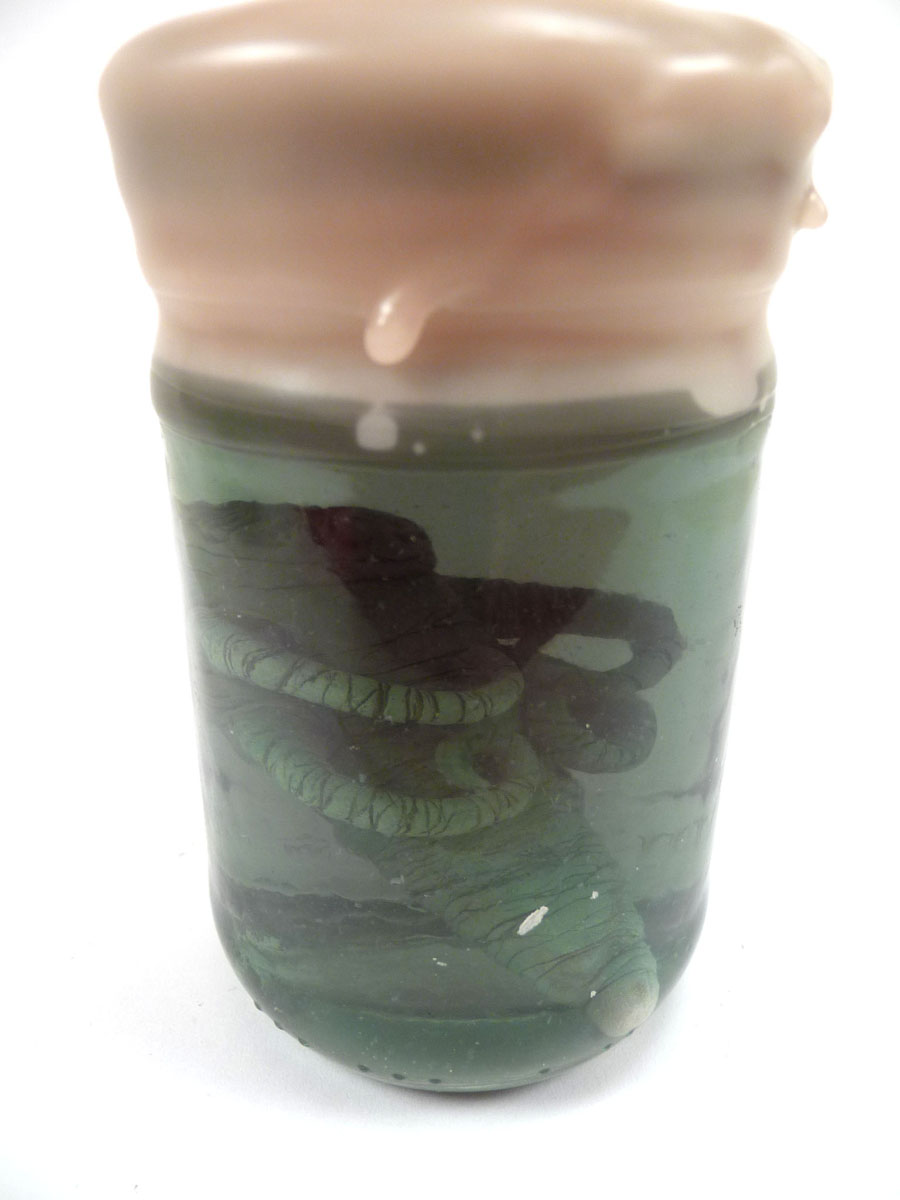
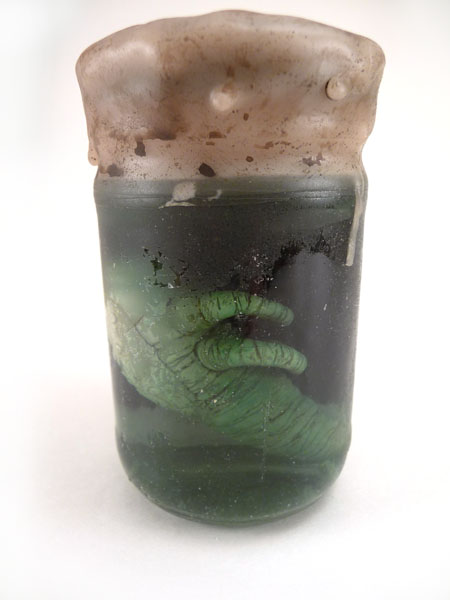
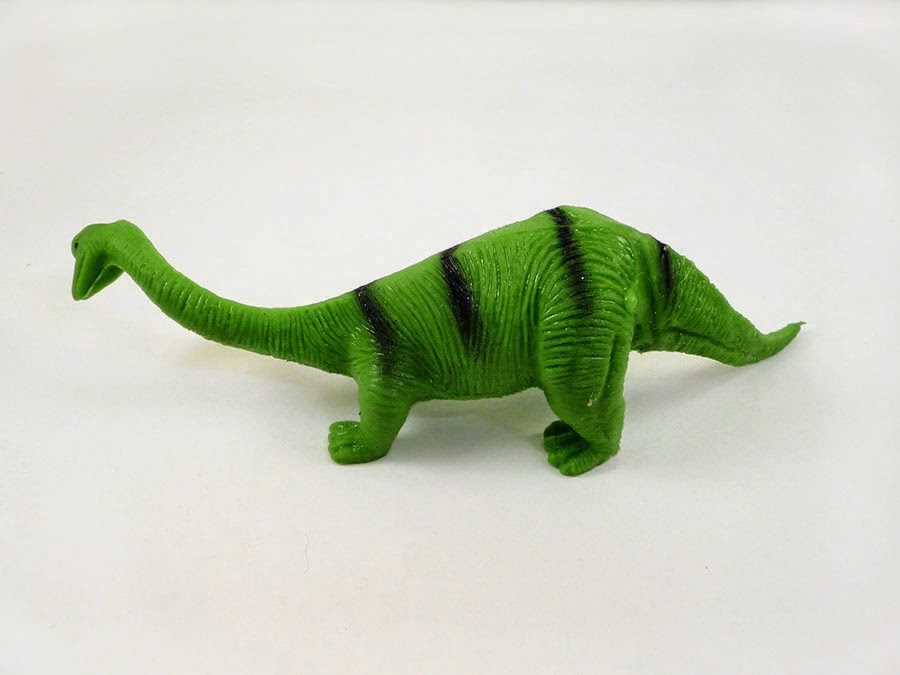
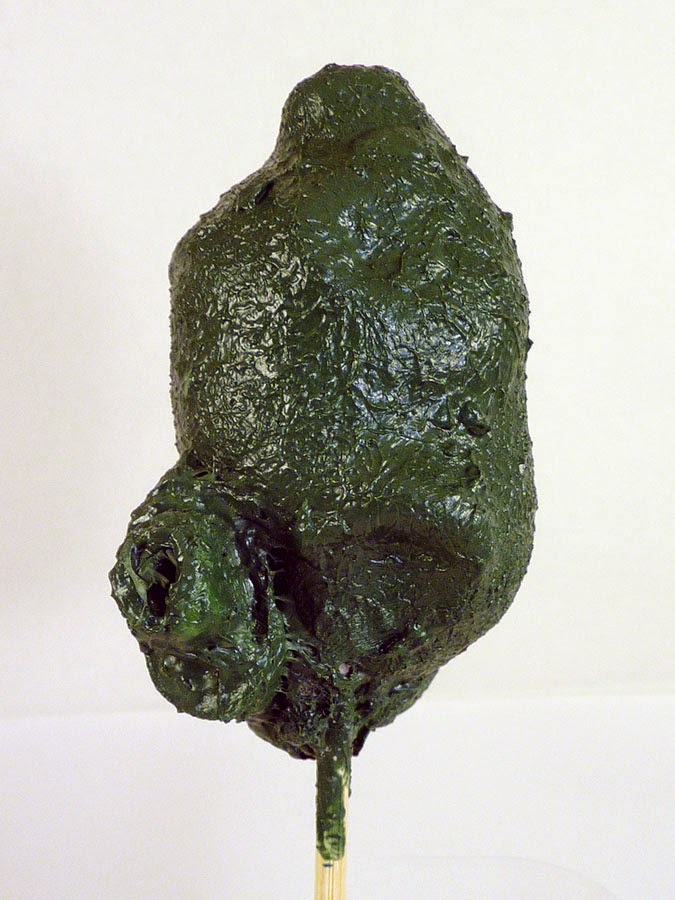
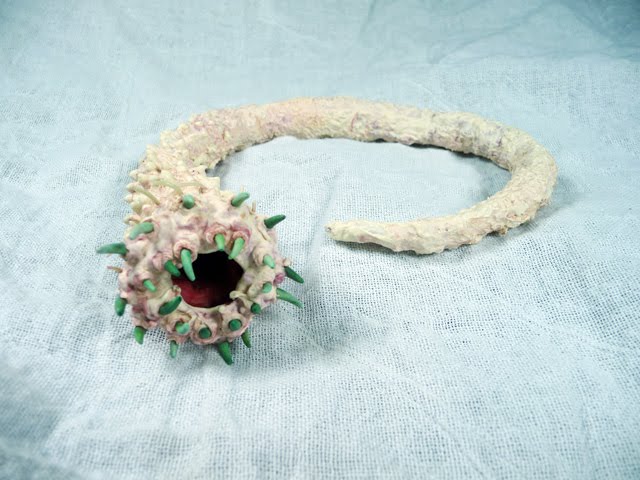
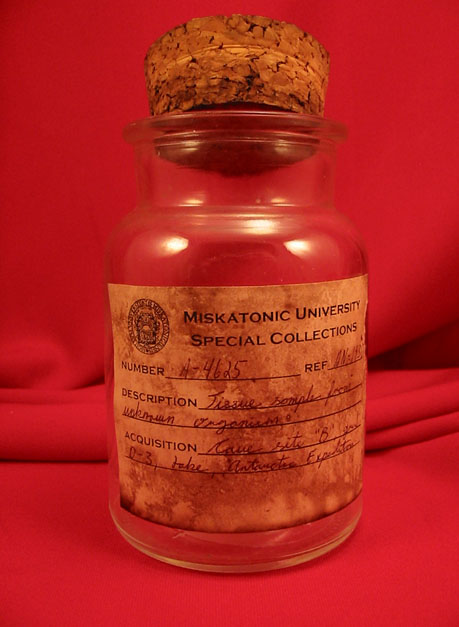
This tutorial will show you how to make a gruesome bit of preserved tissue using cheap and readily available materials.  When you’re done you’ll have something like this:

This tutorial builds on ideas originally shared by “Ravenworks69” in the Halloween Forum.  To start off, you’ll need one of the soft, squishy animals frequently found on discount store shelves in the toy section for around a buck. This will be the core of the tissue specimen. 

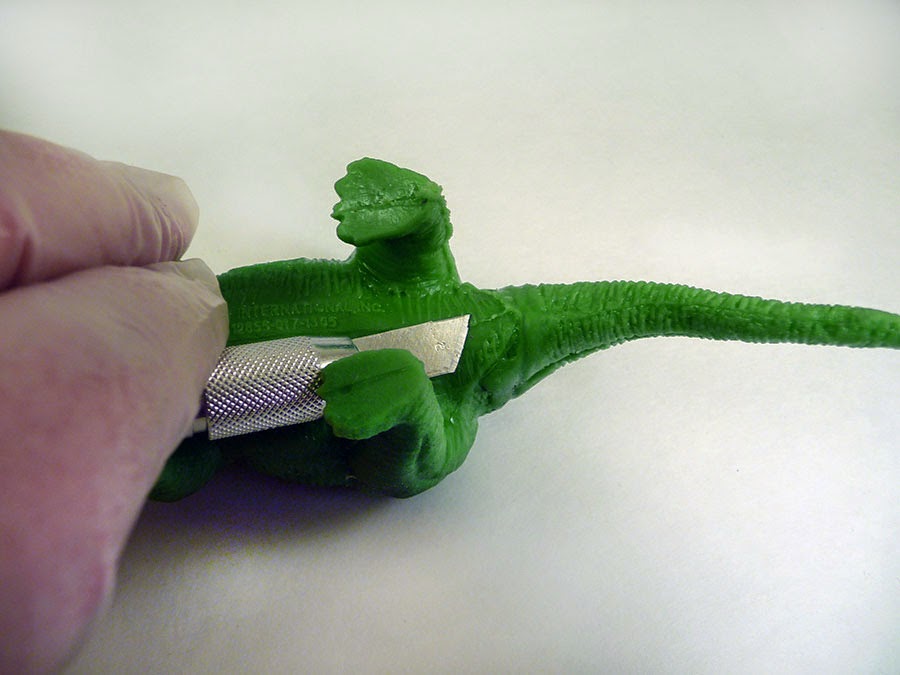
Now grab a sharp hobby knife, cackle madly, and prepare to do some surgery.  You need to cut the critter open to scoop out it’s guts and turn it inside out.   These squishy animals are filled with small polystyrene beads.  Feel around until you find the bottom of the internal cavity that holds them.  There will usually be a seam along the body at this location.
Note that I’m wearing protective gloves.  What,  you want me to perform surgery without taking the most basic precautions?  Are you some kind of barbarian?

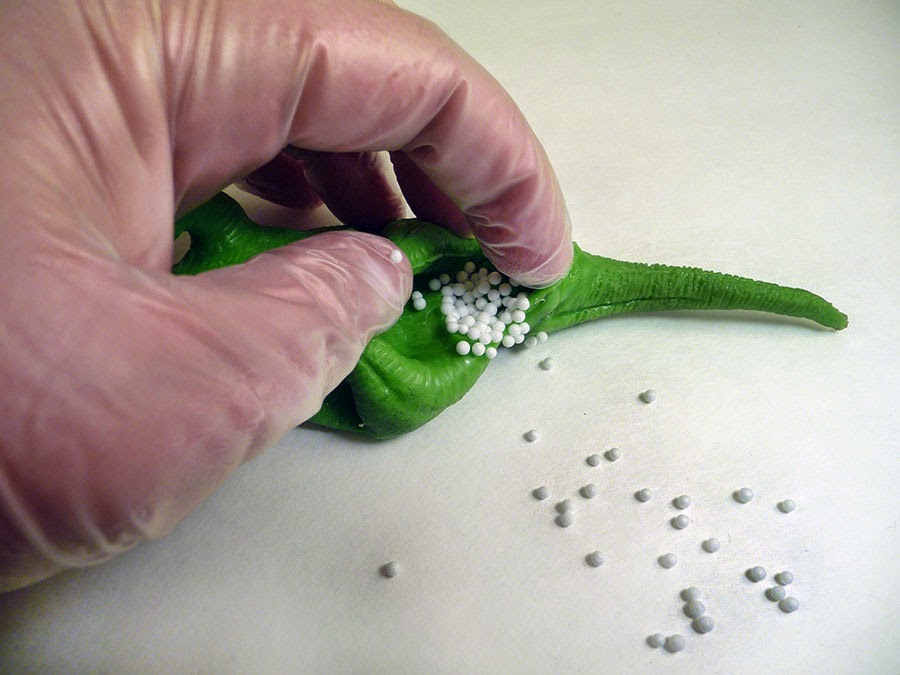
Once you find it, make an incision into the cavity and remove the little plastic beads inside.  A shop-vac will make this considerably easier, since the little spheres are amazingly sensitive to static electricity and cling to everything.

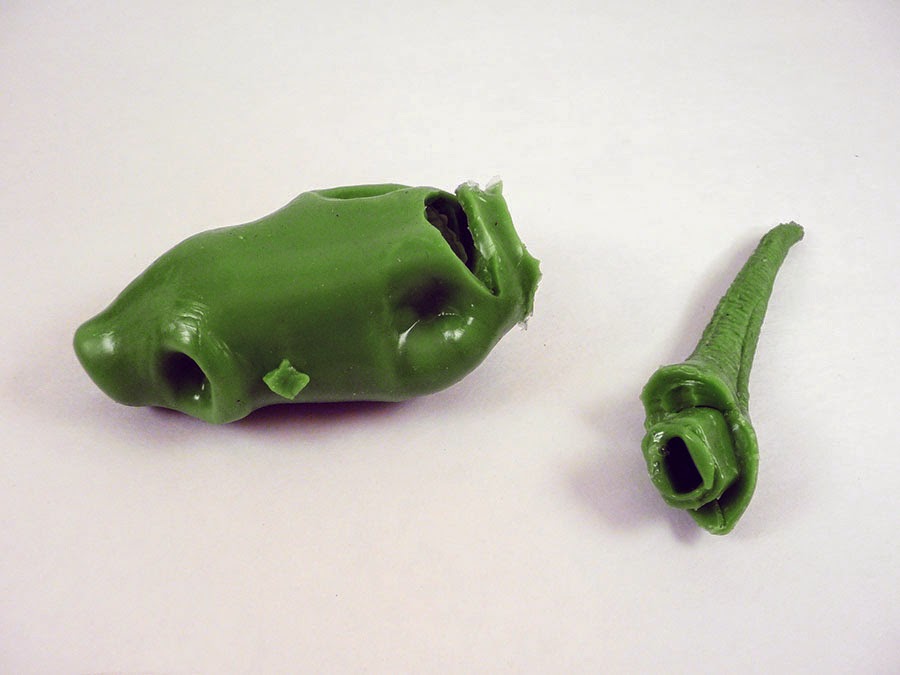
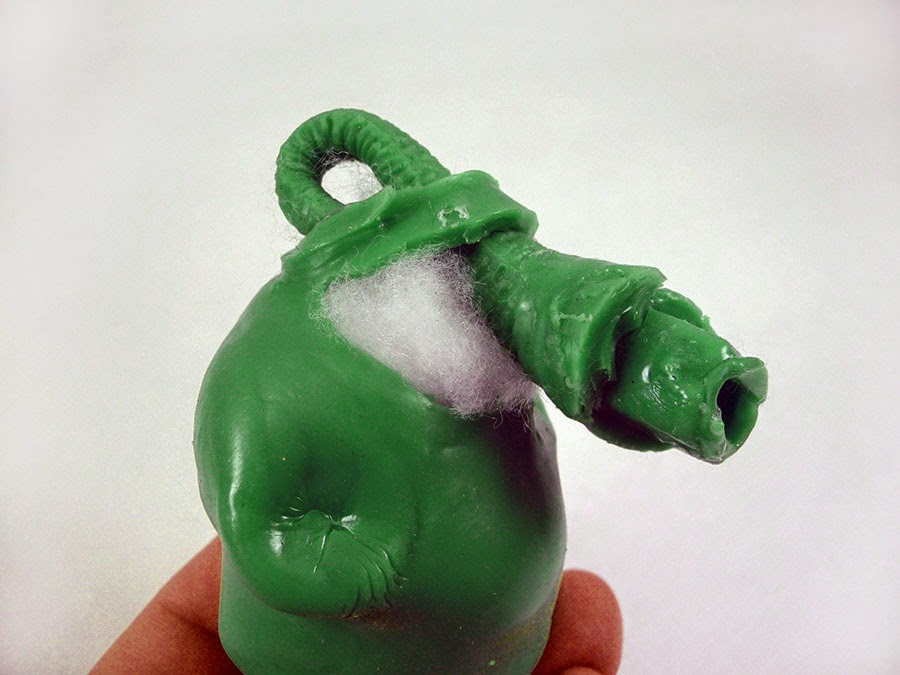
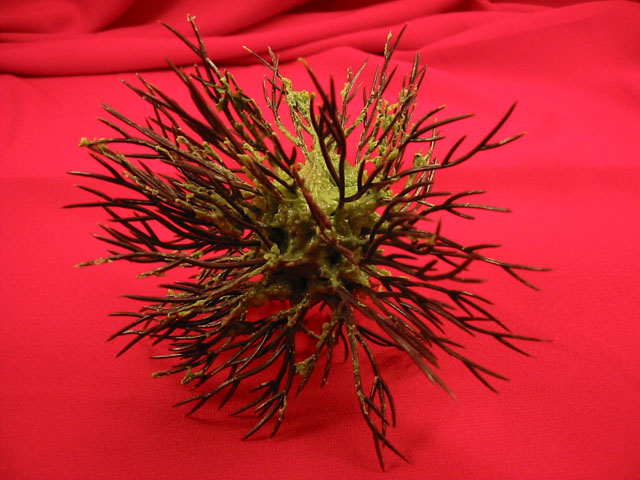
Once the beads are out, remove the tail and turn the whole creature inside out.

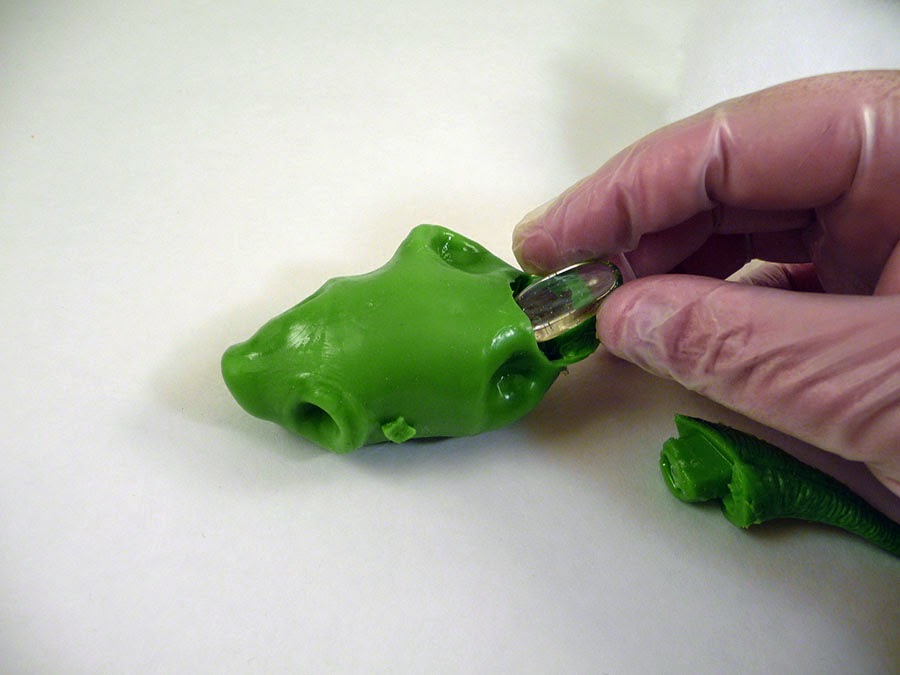
 To keep our specimen from floating to the top of the specimen bottle we need to weigh it down a bit.  Why?  Because the flexible vinyl of the dinosaur, and the other materials we’ll be adding, all float.  We need to add enough mass to make the final creature neutrally buoyant.  Decorative glass gems are perfect for this, since they’re cheap and totally water safe.  Push two or three into the cavity you created when you turned the animal inside out.
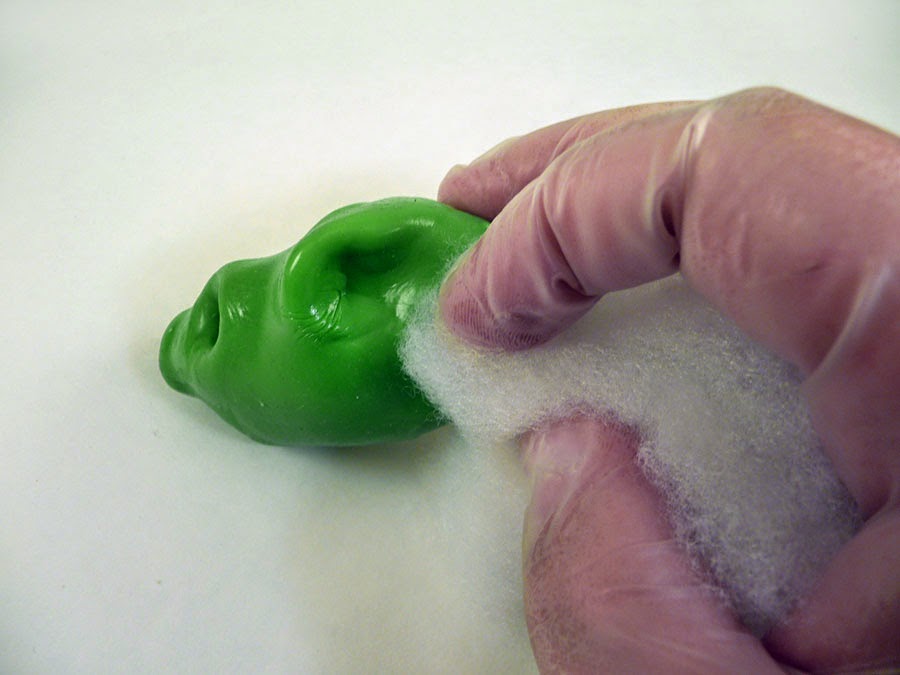
Now we need to bulk up the body.  Hit up the sewing section of your local megamart and you’ll find bags of polyester fiberfill for a few dollars.  Each bag has enough stuffing for one pillow, or hundreds of our little floating nightmares.  Pack the interior cavity with as much stuffing as possible.  Don’t be shy about stretching the vinyl- you want it to give the specimen some heft and body.  The blunt end of a bamboo skewer makes a handy tool for packing in the polyester fibers as tightly as possible.

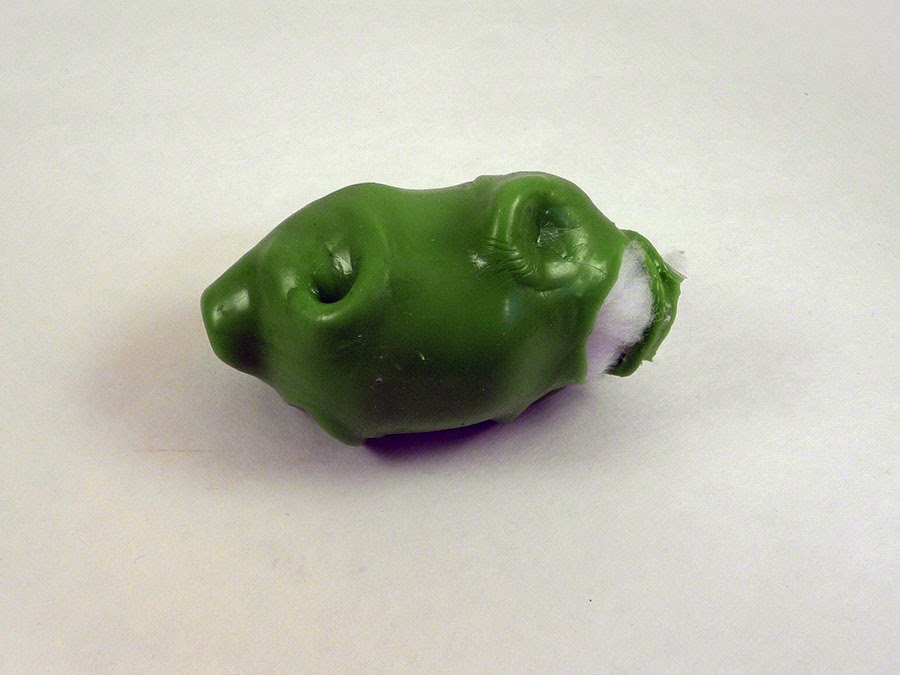
Once you’re done you’ll have a plump little sausage of vinyl filled with glass and polyester.  Hey, isn’t something missing?

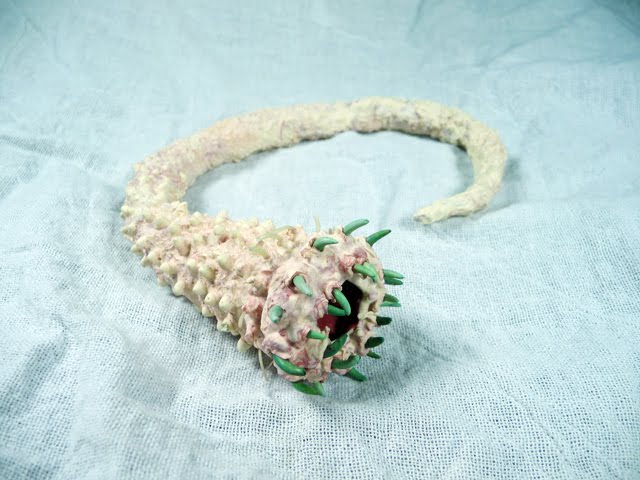
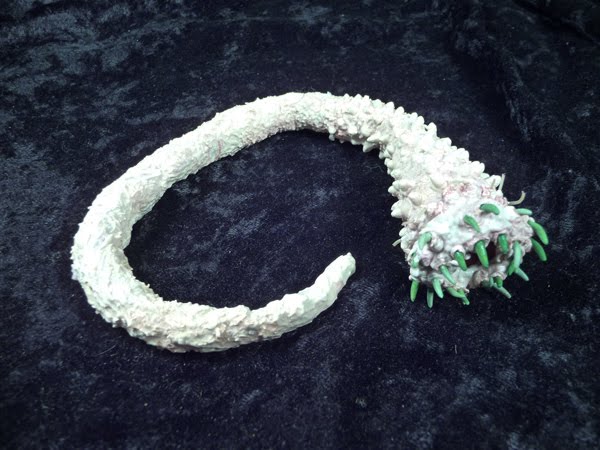
That’s right, the tail.  We’ll stick that through our incision to add some more texture.  Coiling the length of the tail around on itself gives a good approximation of the organic shapes of real tissue.

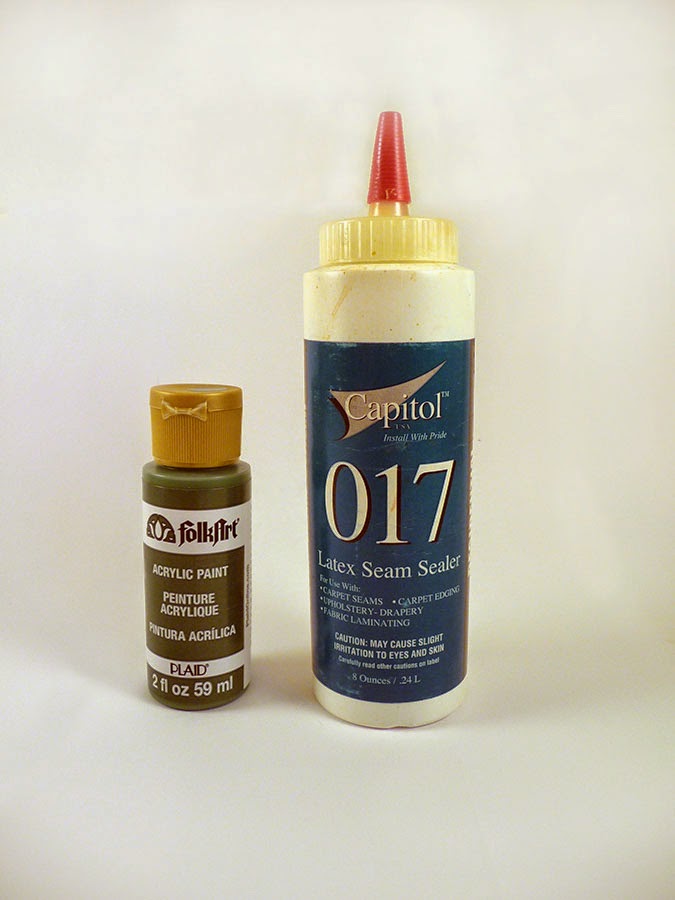
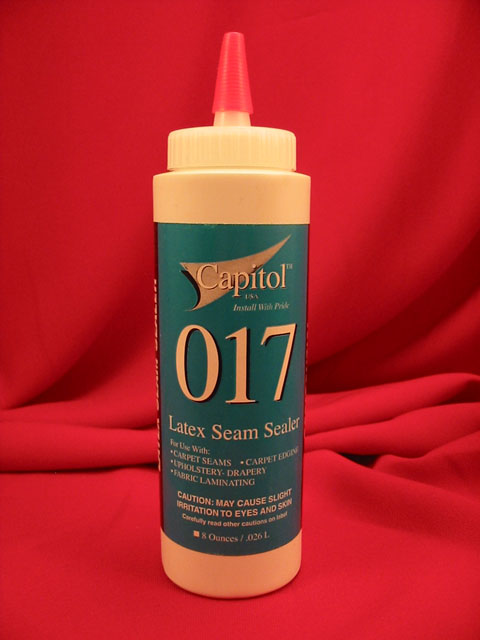
 Now it’s time to give our specimen some skin.  For that we’ll be using a mixture of acrylic craft paint with Capitol brand latex carpet adhesive, available at any Home Depot.  The paint provides the coloring while the latex forms the water-safe skin.  All together both the paint and latex will cost around five bucks, but you’ll have enough to skin about a dozen small to medium specimens.  
Since the dinosaur was bright green I picked a dark ivy green to provide a complementary color.  Any color of paint will tint the latex, but darker colors provide a stronger coloration.  Experiment with color combinations as you see fit.
If you can’t get Capitol, any pure latex will do.  You could spring for moldmaking or mask latex, but it’s considerably more expensive per ounce than off the shelf carpet adhesive.  Just make sure it’s latex based.  If it is, you’ll get an eye watering whiff of ammonia when you open the top.  Ventilate appropriately.
Oh, and they’re not kidding about the “adhesive” part.  If latex drips onto your clothes or carpet you will never, ever get it out.  Dress in old clothes and prepare your work space with that in mind.
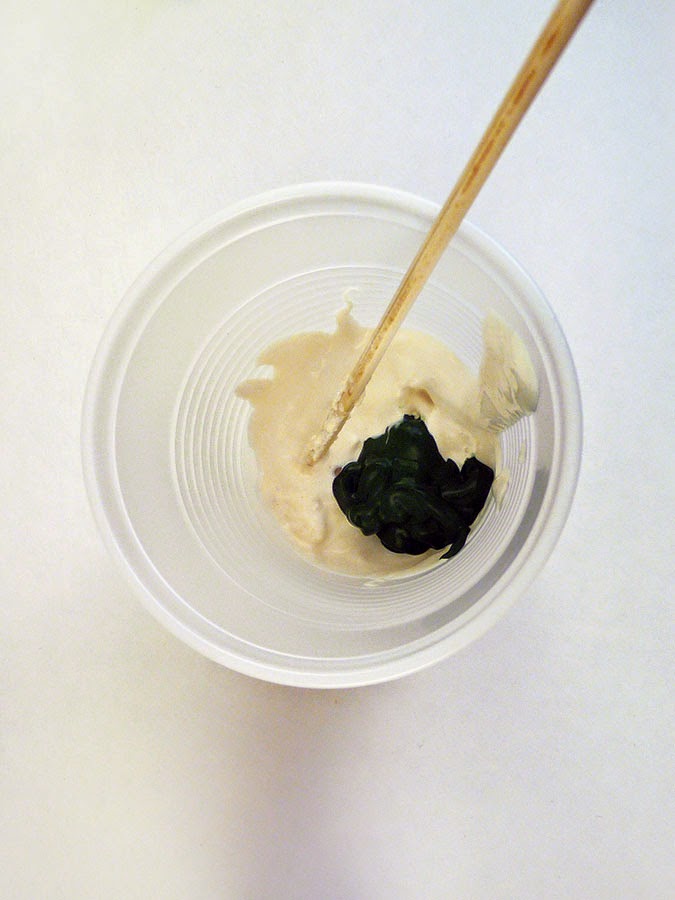
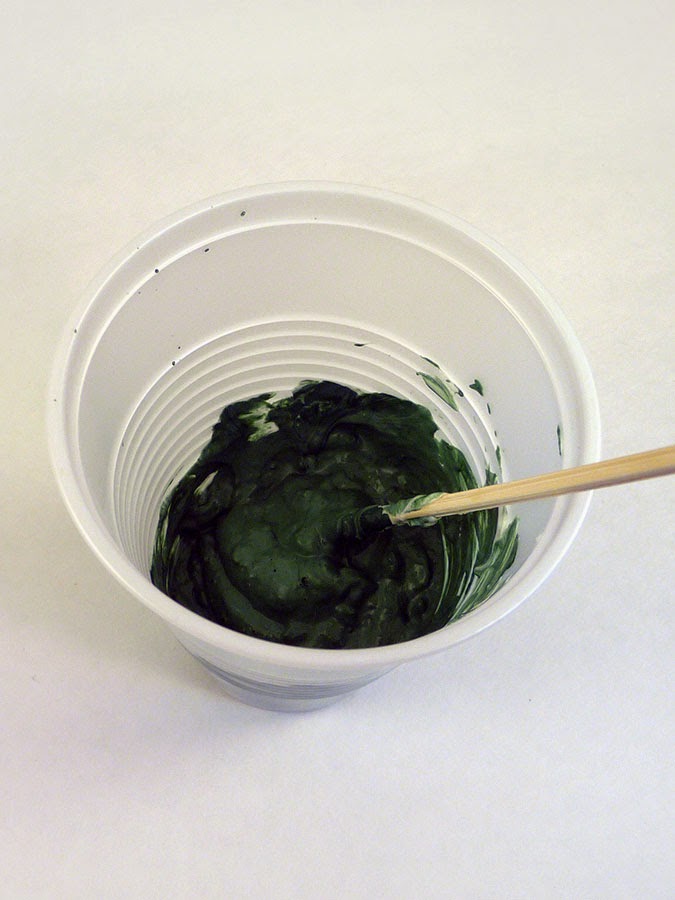
Mix around two heaping tablespoons of the latex with a teaspoon of the acrylic paint in a disposable cup.  You want to thoroughly spread the pigment throughout the latex.  A bamboo skewer or popsicle stick makes a good stirrer.

Keep stirring until the mixture is uniform.  The ammonia fumes will be quite strong, so ventilate appropriately.

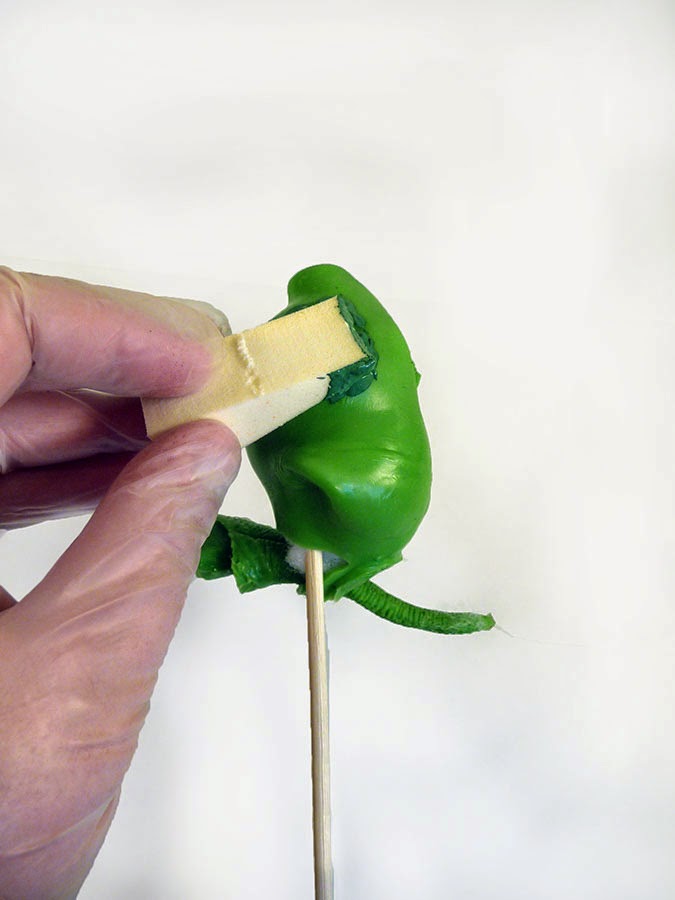
Now we apply the tinted latex to the core of our specimen.  A foam makeup wedge is ideal for daubing the mixture on.  You want a thin, overall coat so the latex can dry quickly.  Don’t worry if you miss a spot here and there- we’ll be covering that up with additional layers of latex.  I’ve mounted the specimen on the end of a bamboo skewer* to make it easier to hold.  Stick the end of the skewer in a cup filled with rocks or some of your leftover glass gems to hold it in place.
*Yes, I love bamboo skewers.  They really do have a million uses.
Once you’ve covered the specimen allow the latex to thoroughly dry.  That can take a few hours in the open air, but sticking it in front of a fan can cut that time down to minutes.  Remember, thin is the key.  You should treat the latex almost like a thick paint, applying each coat as thinly as possible.  Here’s what you’ll have once the first layer dries. 

Now apply another layer of latex,  And another.  And another.  In all I gave this piece six coats of latex.  Let each coat dry before applying the next.  If you daub on the latex with a sponge you can build up some really cool surface texture by taking advantage of the material’s natural tackiness.

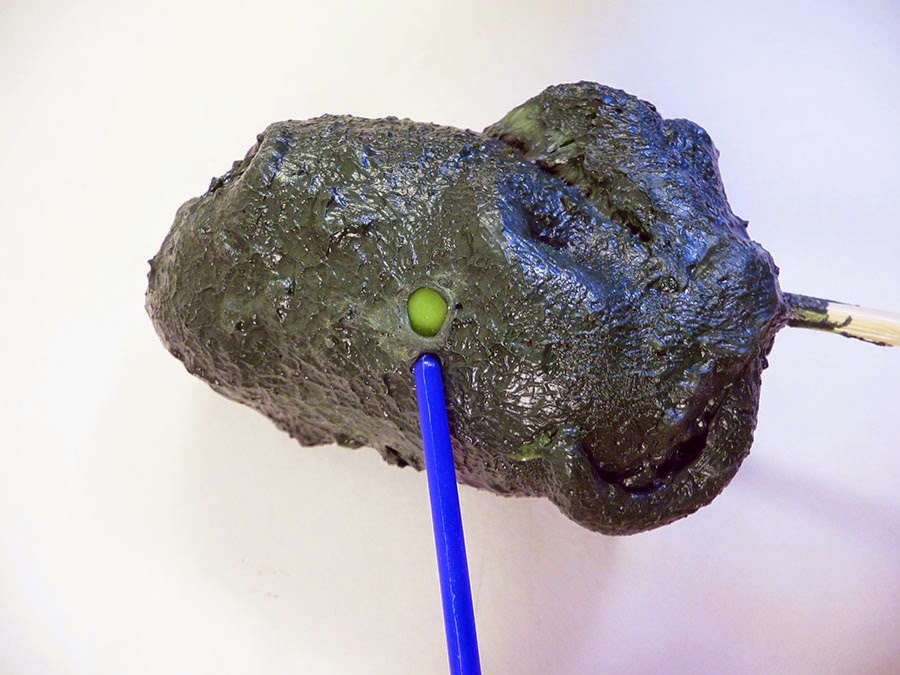
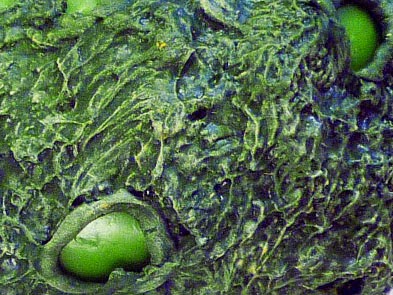
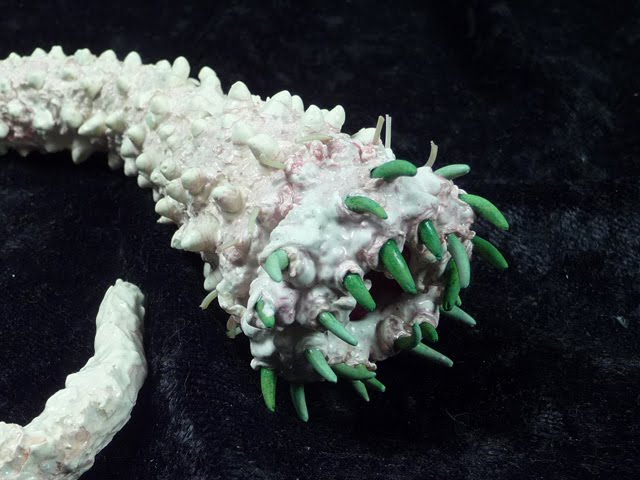
After applying multiple coats of latex it’s time to rub some of it off.  Poke the latex skin with the tip of  a skewer or the end of a narrow-handled paintbrush, anything that will bite into the latex a bit.  The end of this cheap craft paintbrush has a mold line flange that’s perfect.   Then rub against the latex in small circles.  As you apply pressure the latex it will eventually tear away from the vinyl and create a circular opening.  Insert your tool into the hole and keep rubbing it in circles to widen it.

How cool is that?  You get a neat little pustule effect.  Repeat as needed to create a nasty, diseased appearance.

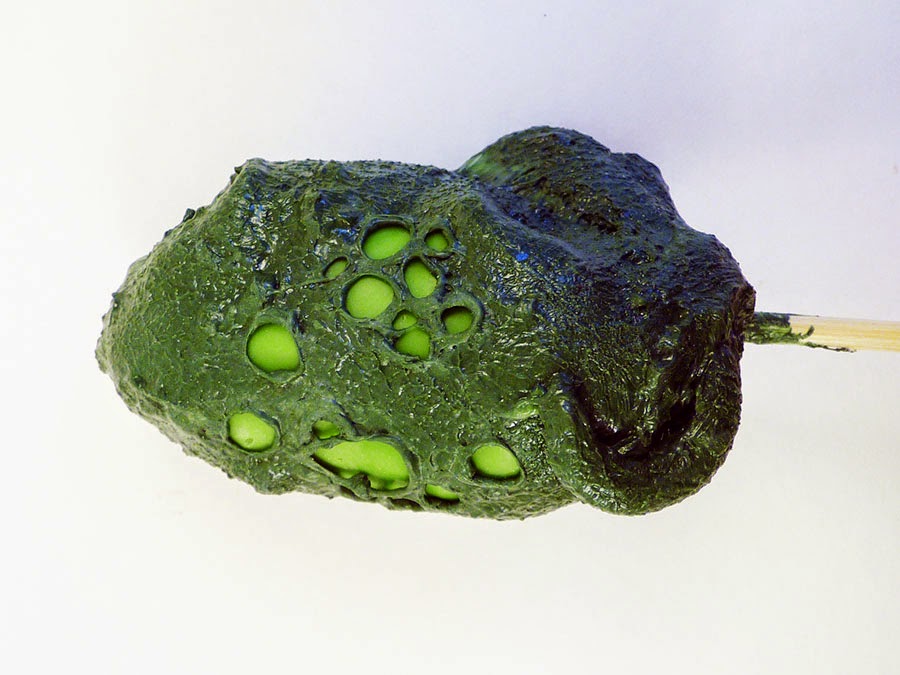
In one fell swoop you’ve added some interesting visual and textural contrast to the piece.  The smooth exposed vinyl contrasts nicely with the gnarled surface of the latex.  Our next step is going to kick up that surface treatment another notch.  We’re going to drybrush the latex with a contrasting color to bring out the details.

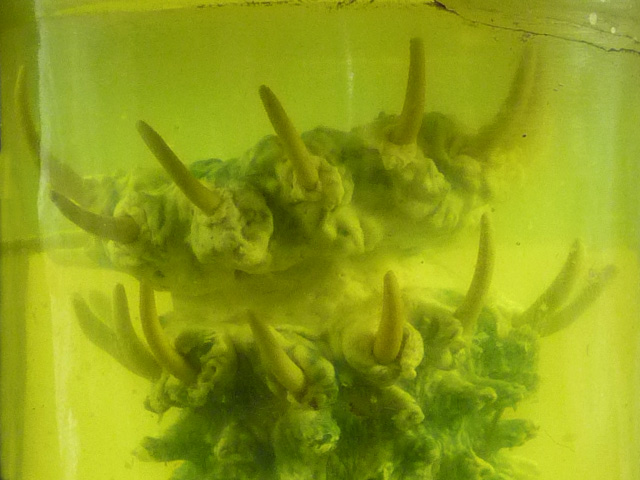
If you’re not familiar with drybrushing, you load a stiff brush with paint, wipe most of it off on a piece of scrap paper, and then lightly run the brush along a textured surface.  The tiny amounts of pigment left on the bristles of the brush stick to the raised areas, producing highlights.   Here’s our specimen after being drybrushed with yellow. 

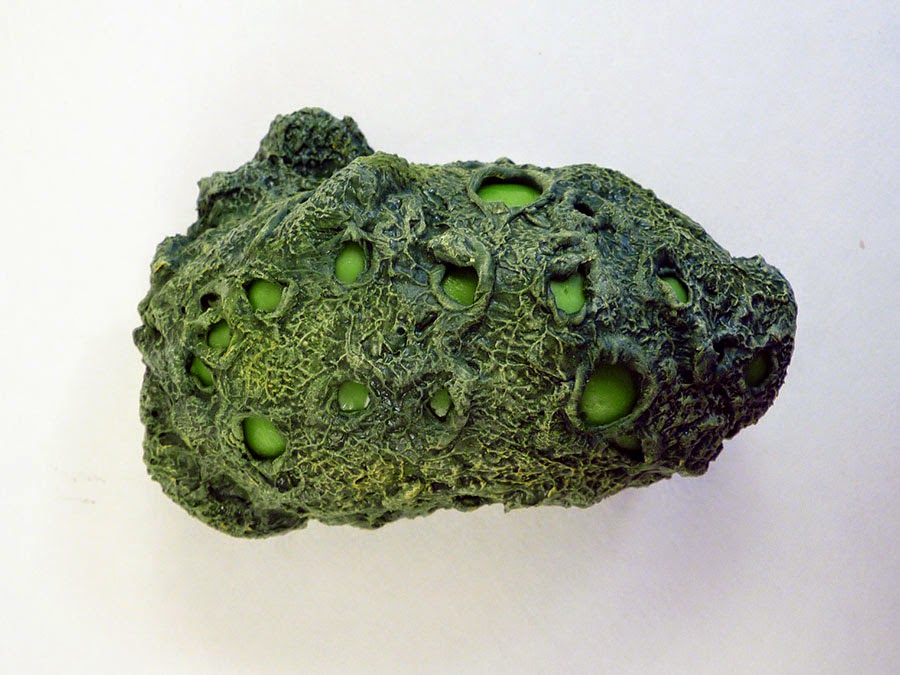
Here’s a closeup of the skin.  See how the yellow pigment clings to the high spots?  That’s how drybrushing adds depth and detail.

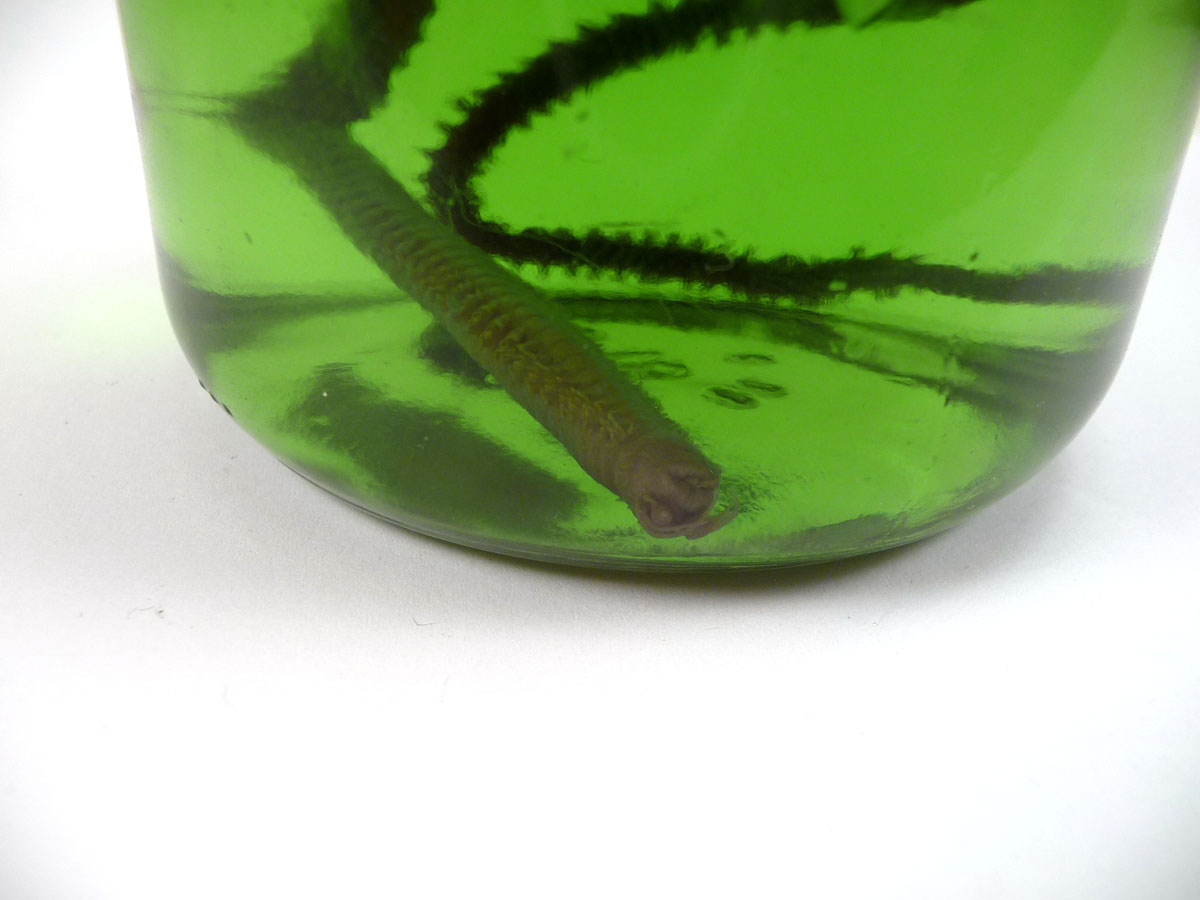
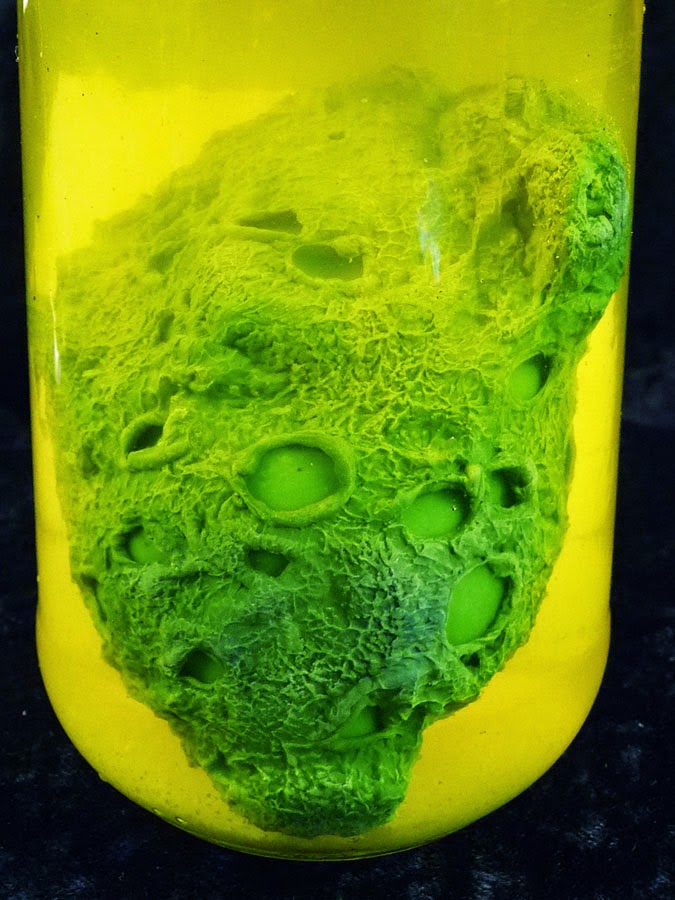
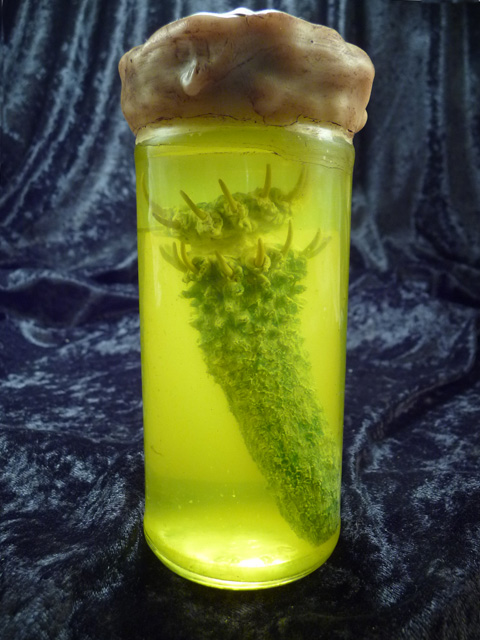
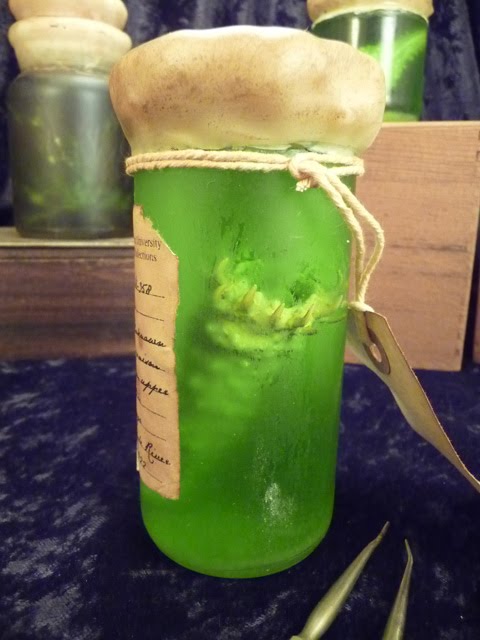
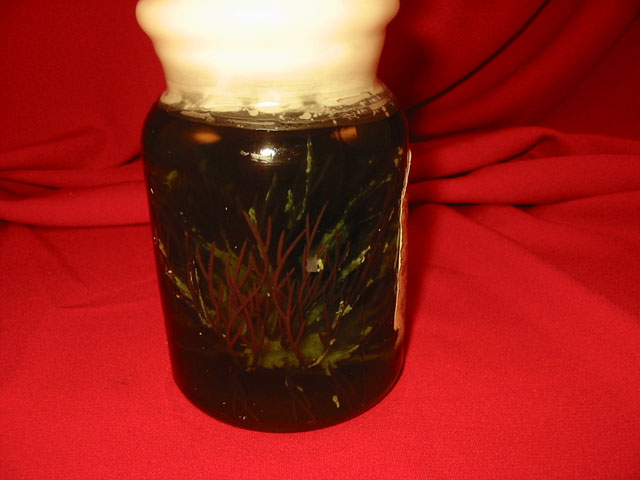
Now you just drop the specimen into a jar filled with water, add a few drops of food coloring and…tada!

Okay, I did skip a few steps there.  But not many.  Rinse out your jar with a weak bleach solution to sterilize it, then fill it with water and drop the finished specimen in.  Gently press out any air that’s trapped inside the specimen.  That should leave your “tissue” sample floating gently along the bottom or side of the bottle.

Food coloring is ideal for tinting the water inside your specimen jar.  I used yellow, which was a bit of a mistake.  It goes nicely with the green, but it also negates the yellow highlighting I spent all that time on.  I should have dry brushed with white instead.

I also added some sediment to the jar by sprinkling in a little garlic powder.  The granules absorb some of the water and swell up, producing a reasonable facsimile of the detritus that flakes off organic specimens over time.  Here’s what it looks like when you give it a good shake.

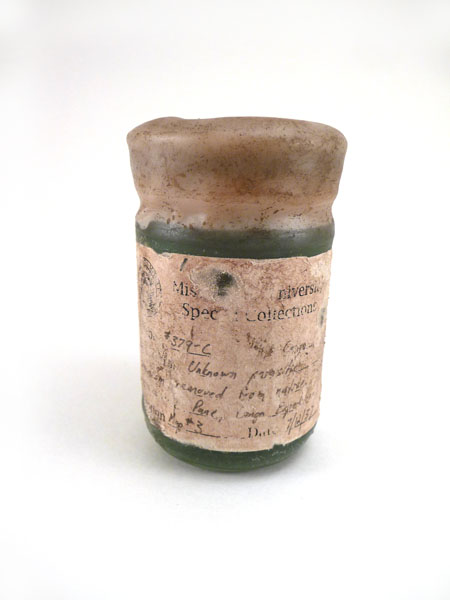
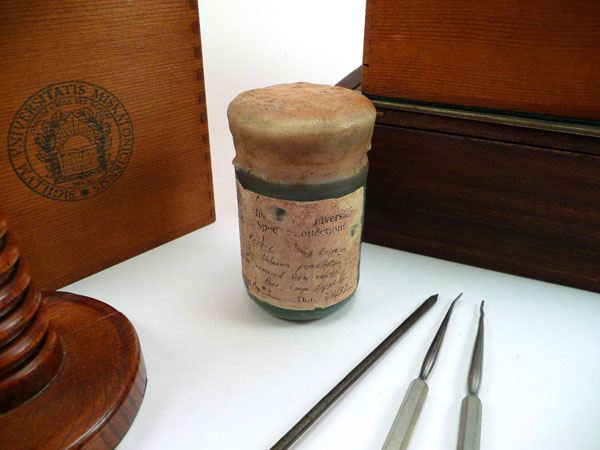
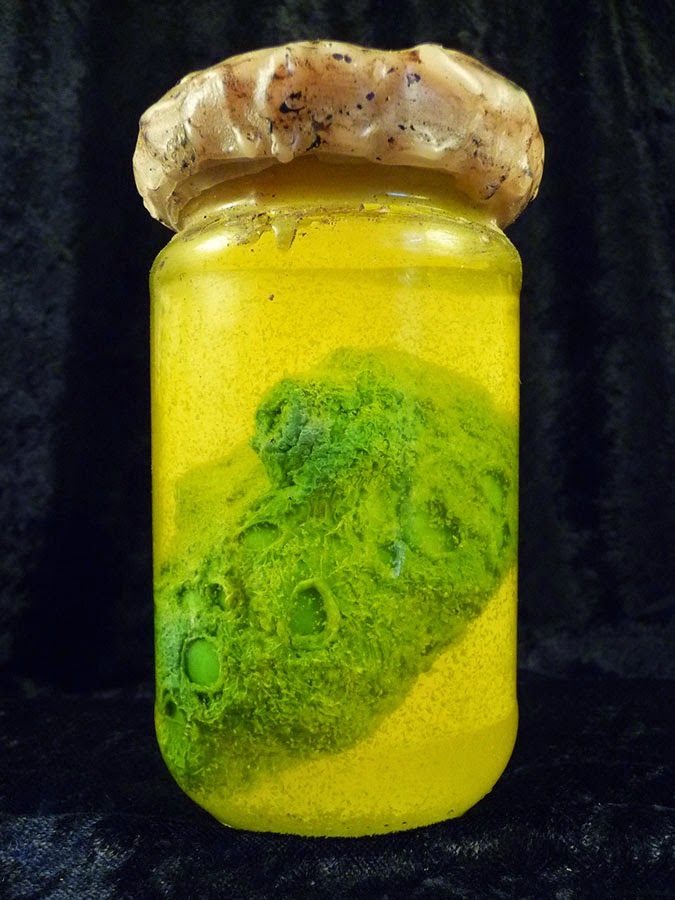
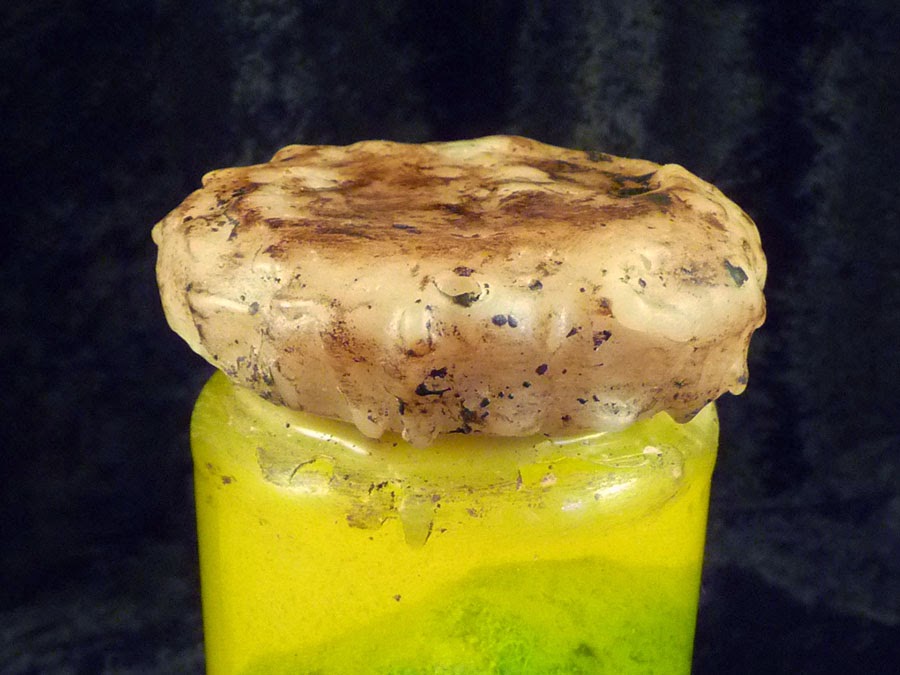
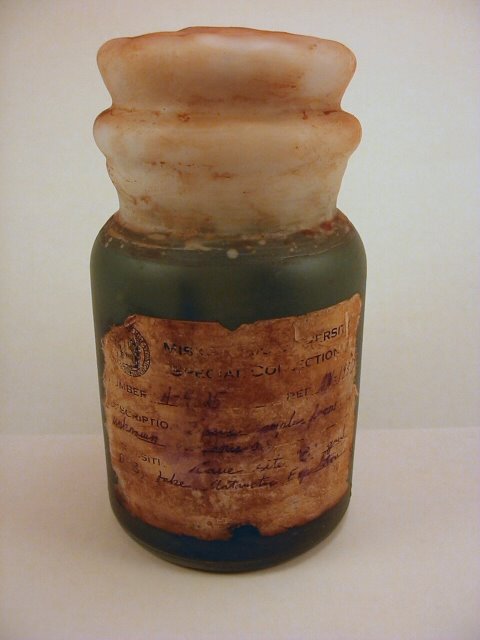
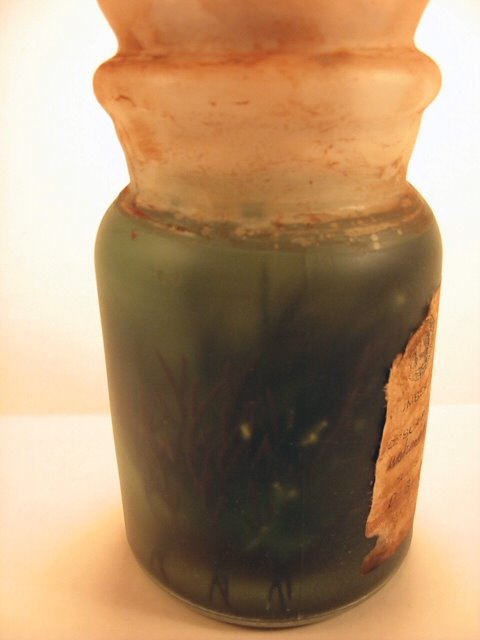
Finally, I added a wax seal.  This is just bog-standard paraffin melted in a double boiler.  I dipped the lid of the jar in the wax, set it aside to cool, and then repeated the process until the full seal was built up.  Then I grunged it up with some wax-based schmutz. 

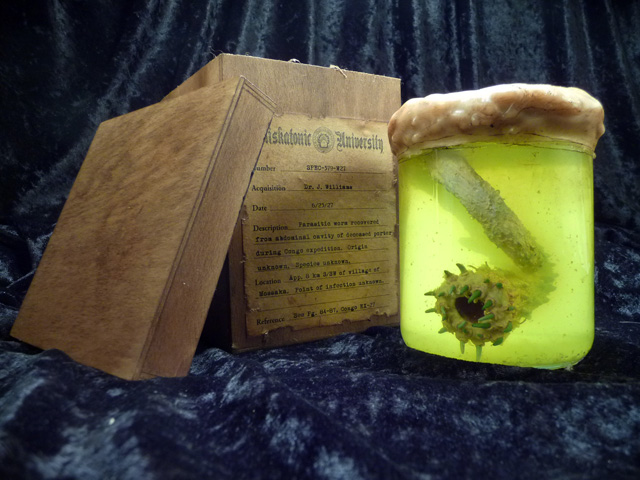
There you have it.  A couple of bucks for materials, a few hours of your time, and you can start populating your shelves with all sorts of bottled nastiness.  There are a multitude of refinements you can add to this basic technique, from labels and collection tags to using different squishy animals as a base.  Want a facehugger from “Alien”?  Trim the body of a rubber spider and hot glue part of a rubber snake to it.

One of the advantages of making a “thing in a bottle” is that you can control how visible the creature inside is.  If your specimen looks amazing just add some food coloring and show off your work.  If it’s not that hot, some sediment and a pinch of chalk dust makes the fluid more opaque and covers up any flaws.

This article originally appeared at Propnomicon.

Creative Commons License
This work is licensed under a Creative Commons Attribution-Noncommercial-Share Alike 3.0 Unported License.

Gravedigger’s Local 16 is not to be held responsible for the content on or anything that may occur (be it good or bad) as a result of visiting any links (or constructing a project that’s detailed on them). Attempt at your own discretion.

Creepy Crawlies

Graham Bartram produced these nicely done bottled specimens and sent over some helpful tips:

“I’ve made my first couple of bottled specimens and attached a couple of photos to so you can take a look. I hope you like them.

What a learning experience that was. In hindsight I can see a couple of things I could have done better and I made a couple of observations to remember for the future. Things to improve include buying a better pen in order to give me a nicer cursive script, I was amazed at how many of my pens are not truly water proof too. :/
Observation wise I noticed that the longer I left the latex, the smoother the worm. If it’s still quite tacky I found I got holes that resulted in a more degraded tissue effect, that’s useful of course, sometimes a degraded tissue effect looks better. I also found that chalk dust and colored chalk dust gave a different effect. Not so dirty but more dusty if you see what I mean. The colored dust gives a more chemical environment look.

I had to use a walnut ink pad for the label as I couldn’t get the crystals but I have them on order and they will be in this week. I look forward to that.

Wax microwaved well too I found , no need for a double boiler but the pyrex jug I used does get a bit hot and it needs stirring every 30 seconds or so.”

If you’re interested in making your own you’ll find some helpful information here and here. My thanks to Mr. Bartram for sharing his work.

This article originally appeared at Propnomicon.

Creative Commons License
This work is licensed under a Creative Commons Attribution-Noncommercial-Share Alike 3.0 Unported License.

Gravedigger’s Local 16 is not to be held responsible for the content on or anything that may occur (be it good or bad) as a result of visiting any links (or constructing a project that’s detailed on them). Attempt at your own discretion.

The Congo Specimen

Another specimen from the Miskatonic University collection, this time from the 1927 expedition to the Congo. As usual, things didn’t end well.

The glowing fluid is a by product of illuminating the interior of the jar with reflected light. The tabletop is lit by shop lights on both sides. Light passes into the jar and gets bounced off a circle of white paper sitting under the jar and a rectangle behind it. I stumbled across the idea trying to get decent shots of specimens floating in fluid.

If you like it, the specimen is currently on Ebay .

This article originally appeared at Propnomicon.

Creative Commons License
This work is licensed under a Creative Commons Attribution-Noncommercial-Share Alike 3.0 Unported License.

Gravedigger’s Local 16 is not to be held responsible for the content on or anything that may occur (be it good or bad) as a result of visiting any links (or constructing a project that’s detailed on them). Attempt at your own discretion.

Bottled Beastie

Another preserved worm that just happens to be available on Ebay. With the crass commercialism out of the way…

I think I may have figured out why the epoxy resin teeth on some worms pick up the dye used to color the water. Before I close up a jar I add a few grains of potassium metabisulfite to sterilize the contents and prevent bacterial growth. I believe the worms prone to absorbing the dye were closed up too soon, before the sulfur dioxide produced by the metabisulfite has a chance to dissipate into the air. Why does that matter? Because it’s the same reaction exploited by the textile industry, where potassium metabisulfite is used to…surprise, suprise…help set dyes.

This is actually a handy thing to know, for two reasons. One, you can prevent dye from staining your critters by allowing the solution to air out before sealing the bottle. Two, you can use potassium metabisulfite to help dye epoxy resin.

This article originally appeared at Propnomicon.

Creative Commons License
This work is licensed under a Creative Commons Attribution-Noncommercial-Share Alike 3.0 Unported License.

Gravedigger’s Local 16 is not to be held responsible for the content on or anything that may occur (be it good or bad) as a result of visiting any links (or constructing a project that’s detailed on them). Attempt at your own discretion.

Latex Longevity

This is a followup to Saturday’s post about the effect on long term immersion on the kind of latex creatures using in “things in a bottle”.

After 48 hours out of the solution the worm has dried and shrunk back to it’s original size. Based on that I think it’s safe to say that the swelling is caused by the latex acting like a sponge and absorbing the water, as opposed to actually reacting with anything in the solution. The latex is firm and tight, in contrast to the soft consistency it displayed right after being removed from the fluid.

After eight months of immersion there’s absolutely no degradation of the latex. I have older specimens that look fine, but this is the first one I’ve opened up and closely examined. The only noticeable change to the body is the loss of some applied weathering to the surface. That appears to be the result of abrasion against the inside of the glass and not any kind of breakdown.

I’m still trying to figure out how the green dye from the fluid colored the epoxy resin of the teeth.

This article originally appeared at Propnomicon.

Creative Commons License
This work is licensed under a Creative Commons Attribution-Noncommercial-Share Alike 3.0 Unported License.

Gravedigger’s Local 16 is not to be held responsible for the content on or anything that may occur (be it good or bad) as a result of visiting any links (or constructing a project that’s detailed on them). Attempt at your own discretion.

“Thing in a Bottle” Longevity

Today I opened up a latex “specimen” that I bottled up in June of last year. Why? To test the effects of time on both the bottle seal and the critter inside.

The seal, consisting of an internal and external layer of silicone for the lid and a coating of melted wax, was in absolutely pristine condition. It took a considerable amount of force to break the wax away, so I think it’s safe to say it won’t flake off under normal use. The lid wasn’t quite so easy. There was some minor movement when I tried to twist it off, but the seal didn’t break until I cut the silicone along the entire circumference with an X-Acto blade. Once that was done the top came off with only minor resistance.

Here’s the specimen right after it was decanted.

The latex is fully intact, but it has absorbed some of the fluid and swelled up. Not surprisingly, the thickest latex bits, particularly the “horns” along the body, are the ones that have grown the most. At a guess I’d say they’re 30 percent larger than in their pristine state.

Outside of that the latex is in tip-top shape. The fluid was a 90/10 mixture of distilled water and glycerin with a few grains of potassium metabisulfite to sterilize the contents, so there shouldn’t have been anything for the latex to react with. Without bacterial action or UV light the latex should be stable for years.

The teeth are the real surprise. They were sculpted from Apoxie Sculpt, and they’ve obviously absorbed the green dye used to tint the preservative fluid. That seems odd given the resistance of epoxy resin to most chemical attacks. It’s not a bad effect, just not something I expected.

I’ll have some more pictures tonight once the specimen has had a chance to dry.

This article originally appeared at Propnomicon.

Creative Commons License
This work is licensed under a Creative Commons Attribution-Noncommercial-Share Alike 3.0 Unported License.

Gravedigger’s Local 16 is not to be held responsible for the content on or anything that may occur (be it good or bad) as a result of visiting any links (or constructing a project that’s detailed on them). Attempt at your own discretion.

A Discovery of Earth Shattering Importance

I think I may have made a major breakthrough in the field of “Thing in a Bottle” technology. It’s downright embarrassing how little discoveries like this make me giddy. Heh.

One of the reasons I don’t make solid polymer clay or resin creatures is that they’ll eventually break after repeatedly hitting the glass inside a bottle. I’ve tried to address that problem with a few experiments using a viscous cationic polymer suspension. Or, as it’s more commonly known, “cheap hair gel from the dollar store”. Sadly, hair gel is filled with characteristic air bubbles, so every specimen looked like a gruesome monstrosity suspended in…hair gel. Ugh.

One of the approaches I tried to get rid of the bubbles while maintaining the semi-solid consistency of the material was boiling it in a microwave. That kind of worked, producing a gel with thousands of very tiny bubbles. Still unsightly, but better than before.

This week I stumbled across the secret of removing all the bubbles from the gel- boiling it twice. Just put about a cup of the stuff inside a pyrex measuring cup or bowl that can hold at least three cups, bring it to a boil in the microwave, then stir in two drops of dish detergent and let it cool overnight. The next day, boil it again, add food coloring to tint, skim the film of bubbles off the surface, pour the gel into your container while it’s still warm, and let it cool to room temperature.

Tada! You get an optically clear suspension. The creature I was using for the experiment doesn’t have a paint job, but you can see it floating serenely in the jar.

I still want to fiddle around with the technique to make sure temperature or pressure changes don’t cause problems, but I’m very optimistic about how useful this will be.

This article originally appeared at Propnomicon.

Creative Commons License
This work is licensed under a Creative Commons Attribution-Noncommercial-Share Alike 3.0 Unported License.

Gravedigger’s Local 16 is not to be held responsible for the content on or anything that may occur (be it good or bad) as a result of visiting any links (or constructing a project that’s detailed on them). Attempt at your own discretion.

Teeth

I’ve been on a “things in a bottle” spree for about a month, cranking out Halloween decorations for friends looking for something to add to a shelf display or mad scientist’s lab. In the process I’ve picked up a few more refinements to the “Making a Thing in a Bottle” tutorial and its followups (here and here). Eventually I’ll get around to redoing the whole tutorial, but for now I just wanted to add a few short notes.

The parasite pictured above has teeth made from epoxy putty, but the rest of the body is a latex skin over a silicone core. While the skin does use some maskmaker latex the rest of the body materials are right off the shelf of the local home store- waterproof silicone caulk and latex carpet adhesive. The latex was brushed on a master form made from hardened polymer clay, allowed to dry, and then another layer was applied. Once the skin was thick enough it was dusted with talc and gently pulled off the form, getting turned inside out in the process. The skin was then filled with silicone to give some firmness.

Why go with soft materials instead of sculpting the whole thing from Sculpey or epoxy putty? Because it’s more survivable. It’s inevitable that your thing is going to bang up against the inside of the bottle while it’s being handled. If the body is soft the force of that impact dissipates harmlessly. A hard, brittle material like hardened polymer clay will eventually get damaged, especially if you have fine projecting detail.

You could, of course, use a real casting silicone to fill the body, but that’s needlessly expensive. Besides, you need the caulk to run a bead along the bottle lid to make sure it stays sealed forever.

This section of the parasite came out phenomenally well, and it’s all thanks to Tom Banwell. Last year he did a post on how to make a quick and dirty slush casting of a tentacle. This entire section was made using that technique. The end of a pipe was pressed into a glob of clay to get the general shape and then dental tools were used to sculpt a negative impression of the detail. Layers of latex were then brushed in and allowed to dry, forming the skin. The latex “mouth” was then removed from the clay and cleaned. The epoxy teeth were added by hand punching holes in the skin, inserting the teeth from the inside, and then brushing a layer of latex to hold them in place. Once that was dry the mouth was attached to the body with another application of latex.

Almost all of the coloration for the critter is integral to the latex- light washes of ivory, yellow, and brown were applied between coats of latex, locking the pigment into the skin and producing a very organic, translucent effect.

I’m sure I’ve made this seem overly complex, but it’s actually a pretty simple process. Best of all, you can do it using inexpensive materials before investing in more expensive alternatives. If you just want to bang out two or three specimens it shouldn’t cost you more than $15 to pick up latex carpet adhesive, a tube of bathroom silicone, and some epoxy putty. If you’re happy with the results you can look into upgrading to mask maker’s latex and maybe pick up a tub of Aves Apoxie sculpt (an awesome putty you can find over here).

Finally, there’s always the Ebay option if you just want a nifty bottled specimen and don’t want to do it yourself.

This article originally appeared at Propnomicon.

Creative Commons License
This work is licensed under a Creative Commons Attribution-Noncommercial-Share Alike 3.0 Unported License.

Gravedigger’s Local 16 is not to be held responsible for the content on or anything that may occur (be it good or bad) as a result of visiting any links (or constructing a project that’s detailed on them). Attempt at your own discretion.

Making A “Thing In A Bottle”: Addendum II

This is a followup on the original post featuring the Making a “Thing In a Bottle” tutorial. Since then I’ve made about three dozen more bottled specimens, progressively refining the technique as issues impacting the long-term stability of the projects pop up. I’ve previously written about ways to insure an air-tight seal. This post will cover the long term viability of a variety of materials I’ve used.

First off, I have some serious doubts about the survivability of polymer clay. By itself it’s a brittle material that is likely to crack as repeated impacts of the sculpted critter against the interior of the glass bottle create stress fractures. This can be alleviated somewhat by using a wire armature as reinforcement, but fine detail work is always going to be extremely delicate. The *only* way to prevent specimens breaking apart is to coat them with a soft, yielding material that can absorb and disperse the force of impacts. Both latex, in the form of rubber cement or liquid latex adhesive, and silicone are ideal for this.

Speaking of latex, I’ve been shocked by how tough it is. I have specimens coated with hardened liquid latex floating in distilled water, isopropyl alcohol, and glycerine and none of them have shown the slightest signs of deterioration. This probably shouldn’t have been a surprise, since exposure to air and sunlight are what causes the latex in masks to deteriorate. The environment inside a specimen bottle is naturally free of ultraviolet light (it’s blocked by the glass) and the limited amount of oxygen present probably isn’t enough to trigger any significant oxidation.

This article originally appeared at Propnomicon.

Creative Commons License
This work is licensed under a Creative Commons Attribution-Noncommercial-Share Alike 3.0 Unported License.

Gravedigger’s Local 16 is not to be held responsible for the content on or anything that may occur (be it good or bad) as a result of visiting any links (or constructing a project that’s detailed on them). Attempt at your own discretion.

Making A “Thing In A Bottle”: Addendum

Based on a few experiments I carried out over the weekend I’m going to add one more step to the Making A “Thing In A Bottle” project from back in March. As you can imagine, that tutorial has been getting an increasing amount of traffic as Halloween approaches.

In the vast majority of cases it isn’t necessary to do anything more than what’s in the existing post, but if your specimen bottles are going to be moved frequently, or sent through the mail as a gift, I would strongly recommend that you apply a layer of silicone sealant to the bottle top before adding the wax seal. First, whether you’re using a cork or conventional screw-top, apply a bead of silicone along the gap between the top and the glass. Then use a cheap craft brush or toothpick to smear a thin layer all over the top. Wait for the silicone to cure and then apply the wax as normal.

This accomplishes two things. One, it significantly increases the integrity of the lid’s watertight seal. Two, it provides enough flexibility between the container, lid, and the wax that changes in temperature or air pressure won’t crack it. Some minor fissures are inevitable, and even desirable from an aesthetic standpoint, but any major breaks will compromise the long-term integrity of the preserved specimen and it’s fluid.

This article originally appeared at Propnomicon.

Creative Commons License
This work is licensed under a Creative Commons Attribution-Noncommercial-Share Alike 3.0 Unported License.

Gravedigger’s Local 16 is not to be held responsible for the content on or anything that may occur (be it good or bad) as a result of visiting any links (or constructing a project that’s detailed on them). Attempt at your own discretion.

Making A “Thing In A Bottle”

There are a couple of tutorials for creating “Things in a bottle” floating around, but this is my approach. It’s a relatively simple process that’s designed to produce a high-quality prop from cheap, readily-available materials.

First off, you’re going to need a “thing” to bottle. For this example I’ll be using a tissue sample from one of the unknown creatures unearthed by the Miskatonic University Antarctic expedition of 1930. This particular chunk o’ guts, tentatively identified as a ganglion-like structure, was made from an incredibly cheap and ugly Christmas ornament and some liquid latex:


The ornament’s original coating of purple glitter has been removed with some soap and water. The green tissue was created by mixing liquid latex with some apple green craft paint and then applying it to the central core of the ornament using a cotton swab. You can find liquid latex in most craft shops in the sculpting section, where it’s sold for making molds. If you can’t find it there, don’t worry. Just drive to your nearest home improvement store and pick up some liquid latex carpet adhesive or seam sealer, which just so happens to be a very thick version of liquid latex. If you’re not sure you have the right kind open the cap and gently waft the fumes towards your nose- if it reeks of ammonia it’s liquid latex.

Oh, by the way- DON’T SNIFF THE BOTTLE DIRECTLY. The high concentration of ammonia in the product is hideously foul and potentially dangerous. This is the kind of stuff you want:

With this stuff alone you can create all kinds of nasty looking tissue samples. Experiment with squeezing a blob onto a glass or ceramic plate, smearing it around, and then letting it dry. It’ll turn into a rubbery, light yellow solid that readily sticks to itself. Use a sponge to evenly spread the liquid latex around and you’ll create a sheet that, when dried, can be rolled up to create a very convincing umbilical cord or veins. Try mixing in some acrylic paint to color it. Try rubbing holes in a dry sheet and then applying more latex. Try sprinkling bread crumbs or coffee grounds into the wet latex. Just keep experimenting and you’ll discover all kinds of nifty textures and effects that you’ll recognize from dozens of horror movies. It’s awesome stuff.

Er..unless you’re allergic to latex, in which case it can kill you. Not sure if you’re within the minuscule percentage of the population that’s allergic to latex? Hit Google and find out how to do a spot test.

Now that you have something to bottle you’ll need…uh…a bottle. I picked this one up at the Salvation Army for 50 cents:


You can download the Miskatonic University label over here. Print it, fill it out with a pen with waterproof ink, trim, and then stick it to the bottle with adhesive from a glue stick. I chose to age the paper for the label before cutting it out and gluing it on, but that’s a matter of personal preference. Both the label and the cork were aged using a solution of walnut ink crystals, because the greenish tint in the resulting brown stain makes it look all dirty and nasty.

Now we come to one of the little tricks that most tutorials leave out- aging the label. We’ve already “aged” the paper by staining it, but now we have to reproduce the physical results of years of wear and tear. That means going over the entire label, with particular attention to the edges, with fine sandpaper. I used 320 grit wet/dry paper.

Compare the “before” picture above with this one “after” the sanding. The label looks really old:

Now it’s time to stick our tissue sample in the bottle, add our preservative liquid, and seal up the cork with wax.

To keep any unwanted algae from growing inside the bottle I’m going to use rubbing alcohol, specifically 91% isopropyl alcohol, as my fluid. Since I want this bottle to look really, really old I’m going to tint it with food coloring and add some fine powder to give it a really cloudy, grungy look. In a measuring cup I pour two cups of rubbing alcohol, add two drops of green food coloring, and then one drop of red food coloring. That gives me a wonderfully foul greenish brown fluid. To this I add a pinch of baking cocoa.

That’s right, cocoa. It’s cheap, safe, and the manufacturing process used to make it produces an ultra-fine brown powder with a multitude of uses for aging and grunging up items.

After doing a test fit of my cork I pour enough of the alcohol into the bottle to come up about 5mm short of the cork. Then I’ll put the cork in the microwave for about 30 seconds to help drive off any moisture that might be inside it. Why? Because the wax seal on the bottle has to be absolutely air-tight or the alcohol will evaporate in a week or two. Then I set the cork aside and start melting my wax.

Here’s something you need to know before moving on to this step- NEVER, EVER HEAT WAX DIRECTLY ON A STOVETOP. Do that and there’s a good chance you’ll burn your house down. You need to use a double boiler. If you’re not familiar with what a double boiler is use Google to find out.

I used an empty tuna can sitting inside an old beat-up pot filled with about an inch of water to melt my wax. The water keeps the temperature inside the can from going over the boiling point of water, so the wax gently melts without vaporizing. Almost any kind of wax will do, from old crayons to candle stubs, but I was lucky enough to score a block of candlemaker’s wax from the Goodwill store for a buck. I broke up the block with a sharp knife and placed the pieces in the can, put the can in the water bath, and then turned on the stove. Once the water started to boil I turned the heat down to simmer and waited for the wax to melt.

Once it was liquid I used a cheap craft brush to apply a thin layer of wax all over my cork. Then I placed the cork, resting on a bed of paper towels, inside a microwave oven for about 30 seconds on high in order to liquefy the wax and get it to fill all the pores in the cork. This is an absolutely essential step in order to keep the fluid inside your bottle from evaporating. Once the wax has cooled a bit place the cork in the mouth of the bottle and start brushing on the liquid wax from your double boiler. Take your time and thoroughly coat the cork, the lip of the bottle, and the top of the bottle. Once you’ve built up a solid layer of wax you can invert the whole bottle and start dipping it into the liquid wax to build up the seal faster.

Here’s what it will look like when your done:

Notice how the coloration of the water makes it difficult to see what’s inside? Use that to your advantage. If you have a “thing” that’s incredibly detailed use pure rubbing alchohol as your fluid so you can show it off. If your “thing” isn’t a work of art for the ages use a colored fluid to hide it’s details, or lack thereof. Here’s a picture of my “ganglion” taken with a flash to make it more visible:

Click through for a higher resolution version. The “ganglion” looks a lot better than I thought it would, so I probably could have used pure alcohol to help show it off. That’s a bit of a moot point, however, since I wanted to recreate the look of a really old, really foul sample bottle. That means there’s one step left- the final aging treatment. This will be an overall coating of dust and grime created by spraying the entire bottle down with matte finish, drybrushing it with baking cocoa, and then applying another coat of matte finish to hold everything in place.

Here are the results. I switched to a white background to help bring out the details.


Now that it’s finished there are a couple of things that, in hindsight, I would have done differently.

First, less food coloring for the fluid. A single drop gives a very intense tint to the alcohol, so next time I think I’ll drop the dye onto a piece of paper towel and then dip the paper into the alcohol. That should give me better control over the amount of coloration.

Second, I would have skipped adding the cocoa to the fluid. The matte spray on the bottle surface provides enough cloudiness that adding solids to the alcohol was redundant.

Third, more dust and grime. I might go back and dirty up the wax a bit more by brushing on a paste of cocoa of paint and then wiping it off.

Finally, I need to be less anal about neatness. While I was sealing up the cork with wax a bunch of it dribbled down along the bottle. After going to the trouble of scraping it all off I realized it probably would have looked better with the wax left alone. It would have provided some texture as well as giving the final dusting treatment some crevices to nestle in.

All in all I’m pretty happy with the final results. More importantly, after seeing how you can get good results with a minimum of effort I hope you’ll at least consider making one of your own rather than paying an ungodly sum for one on Ebay.

Addendum: In the vast majority of cases it isn’t necessary to do anything more than what’s already here, but if your specimen bottles are going to be moved frequently, or sent through the mail as a gift, I would strongly recommend that you apply a layer of silicone sealant to the bottle top before adding the wax seal. First, whether you’re using a cork or conventional screw-top, apply a bead of silicone along the gap between the top and the glass. Then use a cheap craft brush or toothpick to smear a thin layer all over the top. Wait for the silicone to cure and then apply the wax as normal.

This accomplishes two things. One, it significantly increases the integrity of the lid’s watertight seal. Two, it provides enough flexibility between the container, lid, and the wax that changes in temperature or air pressure won’t crack it. Some minor fissures are inevitable, and even desirable from an aesthetic standpoint, but any major breaks will compromise the long-term integrity of the preserved specimen and it’s fluid.

This article originally appeared at Propnomicon.

Creative Commons License
This work is licensed under a Creative Commons Attribution-Noncommercial-Share Alike 3.0 Unported License.

Gravedigger’s Local 16 is not to be held responsible for the content on or anything that may occur (be it good or bad) as a result of visiting any links (or constructing a project that’s detailed on them). Attempt at your own discretion.

Load more

Bad Behavior has blocked 10612 access attempts in the last 7 days.